
A better way to do it?
Every RV owner should be using a water pressure regulator on his city water supply to protect the water system from excessive water pressures. The reason is that RV water systems are designed for low pressures and are normally designed to operate at pressures less than 60#. Many cities have water pressure that is far above that and that could cause serious damage to your plumbing system. The standard answer to this problem has been the use of a water pressure regulator that is purchased from your local RV store. There are several types available ranging from cheap plastic to brass ones and some also have pressure gauges and priced from $5 to $10. There is also an adjustable one that will cost about $35. But none of these are the complete answer to supplying enough water, while still protecting the plumbing systems.
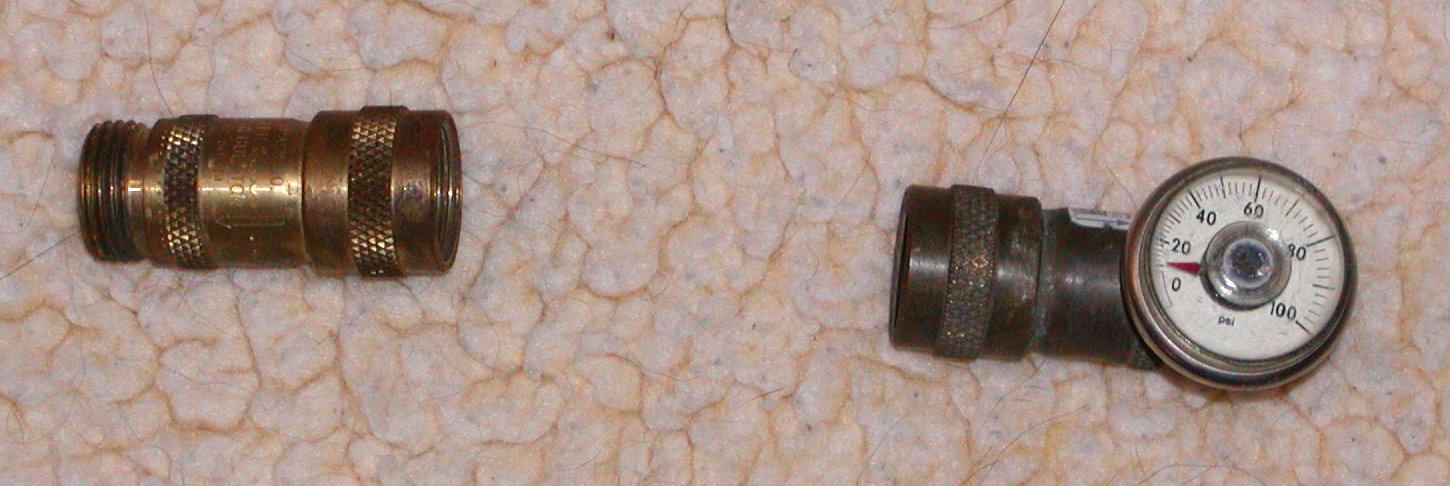
While these regulators do protect the RV water system from excessively high inlet pressures, they are not a total answer. And it has been my experience that the adjustable regulator from Marshall Brass that is sold at the RV supply stores is very little better. The reason is that while these products limit pressure they also limit the volume of water so much that the pressure supplied drops by 10# or more as soon as one begins to use water. The answer is to replace your pressure regulator with one of the "whole house" regulators from a plumbing supply house. I used one by Watts Regulators. (model N45B)
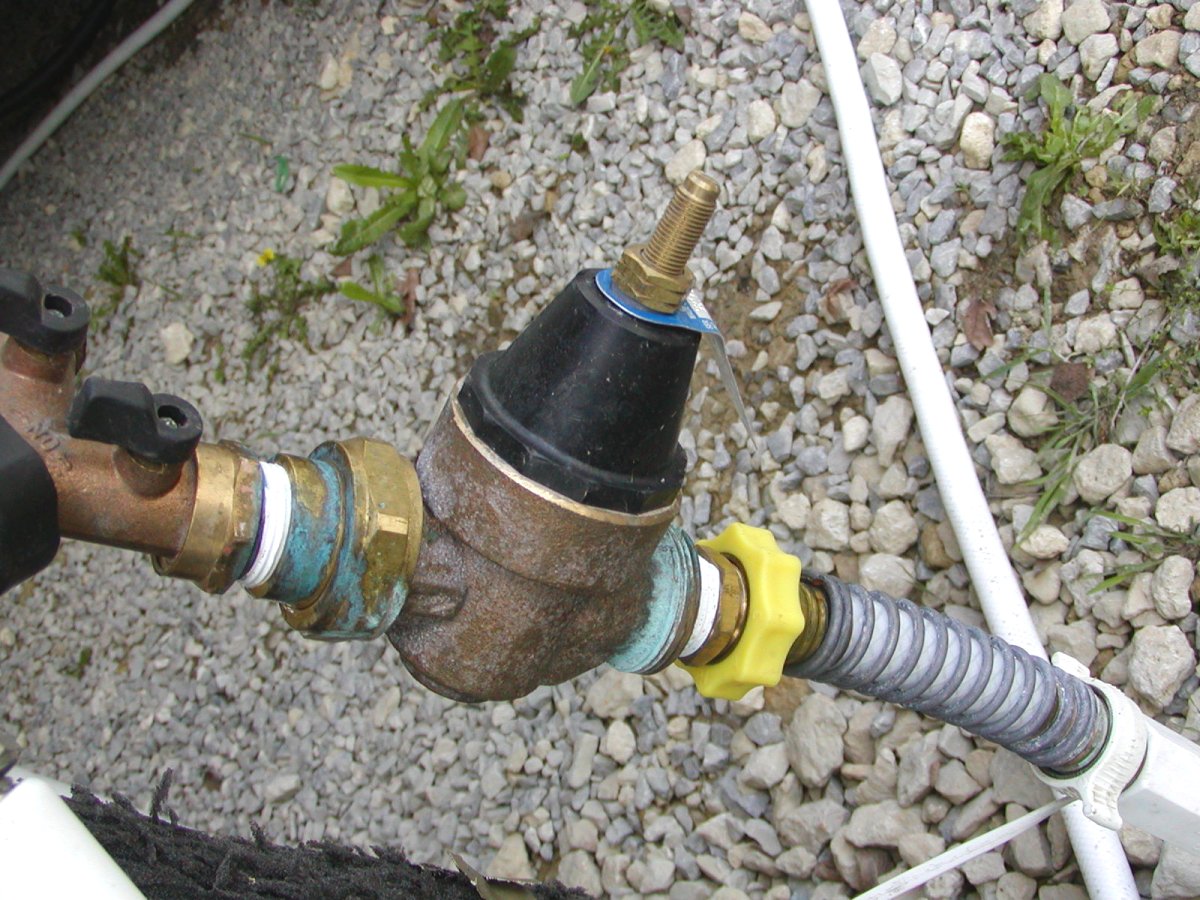

You can get one from most Home Depot stores or from Lowe's. If it is not available from one of these, any plumbing shop should also have them. They are available in either 1/2" or 3/4" flow sizes. I used the 3/4" size for best supply. You will also need a female hose bib for the inlet side and a male bib for the outlet and some teflon tape to seal the connections. You will also need a pressure gauge to adjust the operation pressure of the supply. I used one that is available at most RV supply stores and I attached it to the connection where the water enters the RV so that it shows the pressure down stream of the supply hose. With this system we now have showers and a sink sprayer that work just as well as the ones in a stick built home. The only question that I still have is why it took me so long to get around to doing this. One other suggestion is that you use one of the brass "Y" adapters when you hook up to the water hydrant to allow you to have another hose connected at the same time.
Water Heater Maintenance
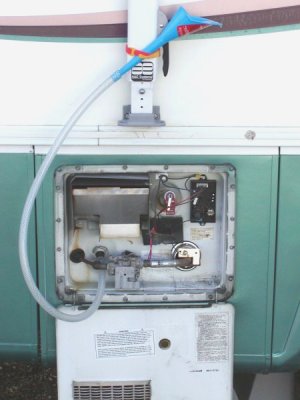
It is generally well known that draining an RV water heater should be done at least once each year to remove any build-up of minerals and solid debris that collects there. But far less known is the fact that it is also a good idea to clean the inside of the water heater to remove that build-up from the heating tubes and electric heating element. The best way to clean a water heater of minerals is the same as for a coffee maker, or any kitchen appliance. You need to run a hot mixture of 50% water and white vinegar through it. The issue then becomes how to get that vinegar into the water heater and at the required strength? I hope that this will help the visitor to our site to accomplish this task. My experience would indicate that this work is very important! When I completed this task I found that I had removed at least a cup full of minerals that were still in small, but soft pieces. We have been fulltime for 4 1/2 years and this is the first time that I have done this. Before you begin, use plastic bags or sheets to cover all electrical connections to insure that no water gets into the connections. It is also a good idea to cover the burner area to keep water out of it, but if you cover it, be sure to remove it prior to turning the heat back on.
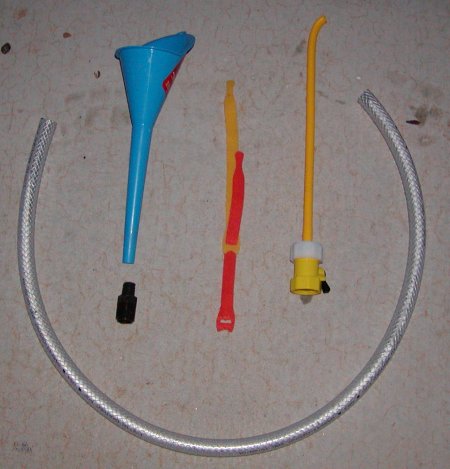
I purchased a funnel from the automotive department, the "Velcro" straps came from and RV store but any means of tying up the assembly would work. The next item is a water heater flush nozzle from the RV store. Below the funnel is a barbed fitting from the lawn sprinkler department of Home Depot or Lowe's. It will need to be 5/8" for an Atwood or 3/4" for a Suburban water heater. The hose is a 3' of food quality hose from the same store of the proper size to fit on the barbed fitting.
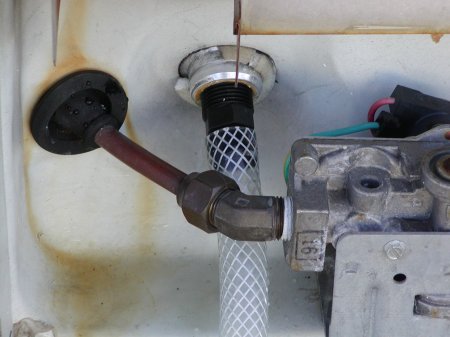
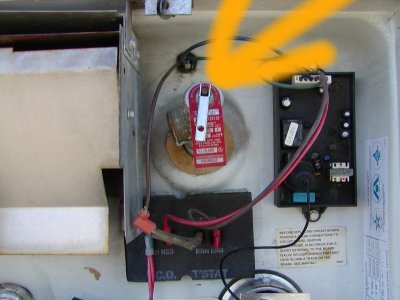
Turn off the water heater and allow several hours for it to cool. Before you remove the drain plug, run some water from one of your hot faucets to make sure that the water is not hot enough to burn you. Next, turn off the water to the RV and remove the drain plug (see the left picture) and allow it to drain. To drain it more quickly, lift the lever of the pressure relief valve shown to the right. That will allow air into the heater and the tank will drain much more quickly, and it is good to exercise the valve to keep it working properly. With the drain plug out, close the relief valve and turn city water back on to flush out the tank. Once water is turned off again, lift the relief and leave it in the up, or open position. Screw the barbed fitting into the drain of the water heater and put the hose on to the fitting, once it is in place.
Next, insert the funnel into the other end of the hose and fasten it in some way to hold it above the top of the water heater. With the relief valve in the open position you can now pour the white vinegar into the funnel and thus into the water heater. Use three gallons of vinegar for a six gallon heater and four gallons for an 8 gallon heater. Once all vinegar is in the water heater, pour another gallon of plain water into the funnel to be sure all vinegar is in the heater. If you covered the burner area, remove the plastic from it next. Now, with help from an assistant, turn the water supply back on until the water just begins to come out of the relief valve. Turn off the water and close the relief valve. Now it is time to turn the water heater back on and to allow it to reach the operating temperature. The water will run out of the funnel as the water expands, but that is of no concern as there will be no significant pressure on the water heater and none is needed. Once the water heater turns off, allow it to sit and soak for at least an hour before draining.
This is to soak the lime and minerals coating the heat transfer areas of the water heater and to remove any coating. While it is soaking, if you have one of the electric heating elements that install into the drain plug, put it into a pan and cover it in a 50% solution of vinegar and allow it to soak as well. It will then be easy to remove any mineral build-up from the heating element. If your water heater is a Suburban with an anode, check it and replace it if the rod is 50% or more eaten away. When it is time to drain the water from the heater, just remove the funnel and lower the hose to allow the water to drain, placing the hose on something to prevent dirt from entering it. Then lift the relief valve again and the water will quickly drain. Remove the hose and plug and install the flushing device on to a garden hose and use it to wash the interior of the heater and by pointing it downward you can make sure that all solids will be flushed from the heater. It is a good idea to close the relief valve before flushing to insure that excess water does not overflow from it. Cover the burner area again before you begin the flushing process as water in it will make it fail to light. Continue to use the flushing tool until no more particles of mineral deposits come out. Once the water comes out clean, allow the water to drain, reinstall the drain plug or heating element, and refill the water heater. It will fill faster if you have the relief valve open, but close it before the water reaches the valve level to establish an air bubble in the top of the heater to allow for water expansion. Once the heater is filled, run water through a hot water faucet to be sure the air is all out, then turn the heater back on and you are finished, except for the clean-up. Store the tools in a plastic bag to keep them clean until time to do this job again next year. The final step is to sit back and congratulate yourself on what a skilled RV maintenance tech you are! While doing this a proper dose of your favorite libation is required.
Germ Free Water...
It is not uncommon for RV owners to complain of bad water. The first sign of a contaminated water system is usually a bad taste, followed by strange orders emanating from the water supply. Bacteria may have built up in the water tank, especially if the water tank's supply has not been used frequently and has not been replenished with fresh, clean water on a regular basis. When a rig comes out of storage or is being used extensively on a city-water connection, the tank and entire water system should be sanitized before use. Some of the bacterial buildup can cause serious illness; so don't take chances!
Drain the water tank completely, then refill halfway with clean, fresh water.
Mix 1/4 cup of household chlorine bleach for every 15 gallons of tank capacity in a container with a gallon or two of clean water.
Pour this mixture into the water tank. If your RV has a tank fill valve that comes from the city water connection, the mixture can be poured into the hose, or if you use a canister water filter you can remove the filter cartridge and pour the chlorine into it.
Top off the water tank with fresh water.
Pump water through each faucet so that all the lines are filled with the water/bleach. You can easily smell the chlorine odor when it reaches each location.
The hot-water tank holds at least 6 gallons of water. Run the hot-water faucets until this much solution has passed to insure that the old water has been purged from the hot-water tank, and it is now filled with the water/bleach solution from the water tank.
Let the water stand for two or more hours.
Drain the entire water system, and don't forget to drain the water heater.
To remove the bleach odor and taste, mix 1/2 cup of baking soda with a gallon of water and pour into the freshwater tank.
Fill the tank completely and pump this solution through the water heater and the rest of the water lines. Driving the rig around the block will slosh water around and thoroughly clean the tank. Allow it to stand at least two hours.
Drain the entire system and refill with fresh, clean water. Once again pump the water completely through the entire plumbing system.
Proper Care and Feeding of the Waste Water Tanks
There are many hotly debated issues in the RV world, but this is probably one of the most heated. It seems that every product on the market claims to do things that no other product can, and each has it's following. I will try to address the problems of your tanks here and also to explain what we do and why. Like most things in life, this is not a simple thing with only one correct answer.
- Tanks
- Most RVs have two waste water holding tanks, but a few have three. The reason is that waste water comes in two types. The term "black water" means the mix of water and human waste that comes from the toilet. It is kept in a separate tank because the solids and the paper that go into it must be dealt with in a different way than other waste and because some areas still allow the dumping of gray water on the ground. The term gray water is all other waste water from your RV. This tank(or tanks) collects the drainage from the sink(s), shower and the kitchen. A very few RVs have a garbage disposal but they are still rare and I have no experience with one. In a few RVs there are two gray water tanks to save on long runs of drain plumbing. There are also a few cases where the bathroom sink may drain into the black tank. As a rule most owners will put much more water into the gray water tank than into the black tank. For that reason, the RV industry is beginning to put larger gray tanks than black, but the many still use two tanks of the same size. If I were designing an RV, I would make the gray tank about twice the size of the black tank. Just what size you need will depend upon the number of people using the RV, the size of the fresh water tank and the ways you conserve water. It is not possible to predict just what each owner will need because the water use is so very different. We used to travel in a motorhome that had only 40 gallons of water and we we could make that last for five days. Today we have 80 gallons of water and we generally can make that last about five days. We just don't conserve as much as we once did. As a rule, the gray water tank should be 2/3 the size of the fresh water tank since most of your used water ends up there and black 1/3. Usually the total of the waste tanks will be about the same as the fresh water supply and that seems to be a pretty good design.
- Toilet Paper
- This is a hot topic in the RV world and it can be a cost issue if you always use the RV type of paper. The cost is much greater and the need is frequently debated. Like most full-time RVers, we have come to a point that we no longer go to the expense of buying the RV products. We have found that if you always buy TP that is marked as "septic sase" then it will be fine. There are melt tests that many advocate using to put a tissue into a jar of water and see how long it takes to dissolve. This test is OK, but it really isn't the whole story since in the tank there is either bacteria or chemicals that speed the process. It is interesting, but really doesn't prove much. Scott tissue(septic safe) is by far the most popular choice in the full-time community and it is what we use. The reason is that it is readily available and it is one of the least expensive. Another thing is that single ply papers do break down most quickly.
- Chemicals
- Among the most debated RV issues is the use of chemicals in the tanks. Most owners seldom use any treatment in the gray water, even though there are chemicals that are suggested for both tanks and others that make one for each tank. There are no solids in the gray water but it does have things like soap and grease in it. There will be some build-up on the walls of the tank and that probably is not inhibited by use of most chemical products. For the black water, I would suspect that the vast majority of RV owners do use one of the products that are on the market. Products that contain formaldehyde are discouraged because of damage to the septic systems of cities and RV parks as well as the environment. We avoid them because we do not know just what is true and there are plenty of alternatives. Another type of product uses an alcohol base. It works by killing the natural bacteria, just as formaldehyde does. It then liquefies the solids by chemical action and perfumes the results to keep odors down. The third type of product is bacteria based and it is the one that we choose when we use anything. There are two types of naturally occurring bacteria in waste, aerobic and anaerobic. What makes the septic systems work is the aerobic bacteria and the odor is created by the anaerobic bacteria. The bacterial products work by enhancing the growth of aerobic and destroying the anaerobic bacteria. They do not inhibit the natural process, but speed it and they also add some odor control. They are clearly not harmful to septic systems.
- What we do
- Like most full-time RV folks, we started out using various products. We soon moved to the bacterial products and we have continued to do that for more than ten years now. We have found that we very seldom need to add anything to our tanks as long as we are generous with our use of flushing water. If the weather is really hot, we do add a small amount of a bacterial product, whatever is least expensive. But we do that very seldom and never in cool weather. We always allow the black tank to reach at least 1/2 full before we dump the tank and if we dump early we put in water to bring it to that level. That is done to allow the rush of liquid from the tank to carry out any remaining solids that have not become liquid. When we sit still, we leave the gray water dump valve open, closing it for a few days to fill up about once each month to flush it out. A family might find that some additive is needed for the black tank because they may fill it too quickly to allow the natural process to complete the liquefying process but foe a couple it will usually be at least a week between dumpings of the black tank which is enough time for the natural process to do the job. Use generous amounts of water in the black tank no matter what product you choose to use, or not use. Water is the universal solvent and it is critical to the process.If you use enough water the other issues become much less important.
- Cleaning Tanks
- Keeping the waste tanks clean is another issue of debate. There are many different theories of what is best, and since I have not used all of them, I will only comment on what we have found to work. In a seminar by a Thetford representative, it was stated that the very best cleaning agent for the inside of waste tanks is the product Trisodium phosphate, otherwise known as TSP. It can be found in home supply stores in the wallpaper and paint department or from Amazon. We have found that a pretty good substitute for that is a good dose of laundry detergent. Do not use dish detergent because it will suds and you may have bubbles that take some time to go away. We try and use TSP about once each year and laundry detergent every few months. What we do is to mix enough for a strong solution of either product for about 1/3 the volume of your waste tank into a gallon or two of water and then empty that into each waste tank. Next we fill the tank to the 1/3 or so level and then travel to our destination. It is even permissible to use the waste tank if need be, one or two times in route. Once we arrive, we dump the tanks as soon as we get there, and then use as normal again. I do this for the gray tank as well since we have found that very often the gray water will actually smell worse than does the black. My chemist daughter-in-law tells me that it is because the gray does not have the natural bacteria of the black tank and thus tends to be anaerobic.
- I am also a believer in the use of tank flushing systems, especially for the black tank. There are several quality flushing products which can be installed into the tanks but it is best if done while the tanks are new and clean. If you do not have one of these, there is also a wand which can be used on the end of a water hose to spray through the open toilet valve that is very effective and some also use flush devices that mount on the sewer hose connection, but I have found those to be the choice of last resort. I have one, but remain unimpressed.

- Old wives tales and RV folk lore
- The RV world is just as filled with folk lore and myths as is any other part of society. Some of the most common ones relate to the care and use of waste tanks. It used to be quite common for folks to suggest the use of Pine Sol but in time it got around that such products would damage the seals in the system and it has since pretty much gone away. Probably the currently most popular one is what is called the "Geo Method." It is likely popular mostly due to the effort of it's inventor who spends great effort in promoting it. It says to add Calgon© water softener, laundry detergent and liquid chlorine bleach to your tanks. Having looked at it pretty closely I can only say that the inventor lists no real credentials for his knowledge and I have discussed it with an environmental chemist (my daughter-in-law), a waste water treatment operator who visited some of the RV forums and with an engineer who is senior partner in a company that designs and installs waste water and septic systems for large companies, cities and larger home developments. All three had grave doubts about this "system." If you visit enough RV gatherings you are bound to meet folks who use one or more of these home brews and who will insist that they do work better than anything else!
- I suggest you consider this before you choose what treatment you will use. Visualize what it means if one day you open the valve to dump your black water tank and nothing comes out! I suppose that you know about using a "snake" or similar tool to open up a plugged drain. But when you do that, you are above the point of the plug and when it opens the water goes down the drain, away from you. Now consider the problem in your black tank. Since the tank is between your toilet and the drain lines, it is very unlikely that you can get this device to go down into the drain line to through the toilet. That means that to clear the problem you must remove the drain hose from your sewer connection to get access to it. Next, open the offending dump valve. Now you need to run the device up the drain line toward the full tank. Consider just what is going to happen to announce that you have succeeded in clearing the line. Everything will come out with a rush and it is going to be difficult to miss! Many RV shops will not work on this type of problem so................. I think that this might be what is called a "learning experience!"
- After many years of RV experience there is one thing that I can tell anyone with confidence about waste tanks. If you use water generously enough in you waste tanks you will probably never experience plugged drains and as long as all parts of the plumbing are working properly you will have little odor problem. Waste tanks are amazingly forgiving if you use enough water.
- If you have the bathroom exhaust fan running when you flush that will usually draw sewer gas from the tank into the RV and a leaking plumbing vent on the sink drain can bring in just a bad an odor from the gray tank.