
Water Heater Maintenance
It is generally well known that draining an RV water heater should be done at least once each year to remove any build-up of minerals and solid debris that collects there. But far less known is the fact that it is also a good idea to clean the inside of the water heater to remove that build-up from the heating tubes and electric heating element. The best way to clean a water heater of minerals is the same as for a coffee maker, or any kitchen appliance. You need to run a hot mixture of 50% water and white vinegar through it. The issue then becomes how to get that vinegar into the water heater and at the required strength? I hope that this will help the visitor to our site to accomplish this task. My experience would indicate that this work is very important! When I completed this task I found that I had removed at least a cup full of minerals that were still in small, but soft pieces. We have been fulltime for 4 1/2 years and this is the first time that I have done this. Before you begin, use plastic bags or sheets to cover all electrical connections to insure that no water gets into the connections. It is also a good idea to cover the burner area to keep water out of it, but if you cover it, be sure to remove it prior to turning the heat back on.
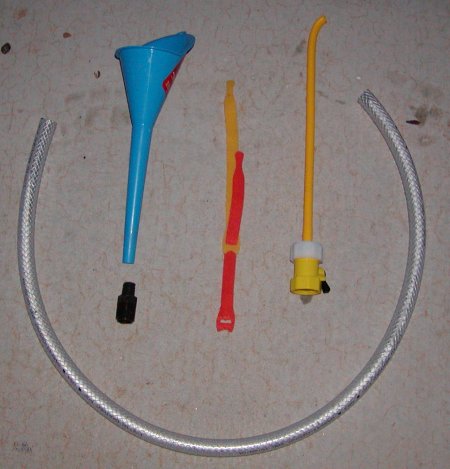
I purchased a funnel from the automotive department, the "Velcro" straps came from and RV store but any means of tying up the assembly would work. The next item is a water heater flush nozzle from the RV store. Below the funnel is a barbed fitting from the lawn sprinkler department of Home Depot or Lowe's. It will need to be 5/8" for an Atwood or 3/4" for a Suburban water heater. The hose is a 3' of food quality hose from the same store of the proper size to fit on the barbed fitting.
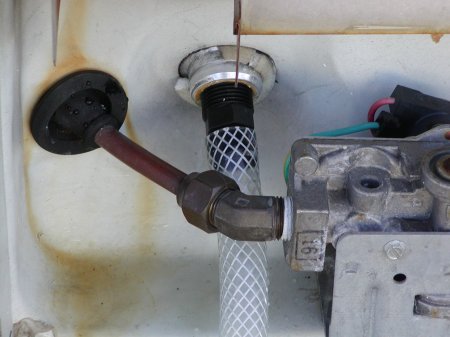
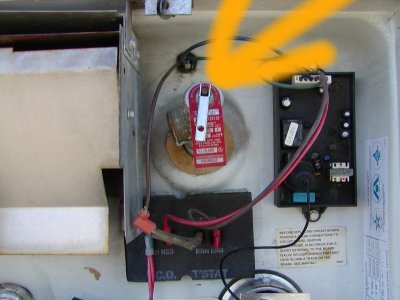
Turn off the water heater and allow several hours for it to cool. Before you remove the drain plug, run some water from one of your hot faucets to make sure that the water is not hot enough to burn you. Next, turn off the water to the RV and remove the drain plug (see the left picture) and allow it to drain. To drain it more quickly, lift the lever of the pressure relief valve shown to the right. That will allow air into the heater and the tank will drain much more quickly, and it is good to exercise the valve to keep it working properly. With the drain plug out, close the relief valve and turn city water back on to flush out the tank. Once water is turned off again, lift the relief and leave it in the up, or open position. Screw the barbed fitting into the drain of the water heater and put the hose on to the fitting, once it is in place.
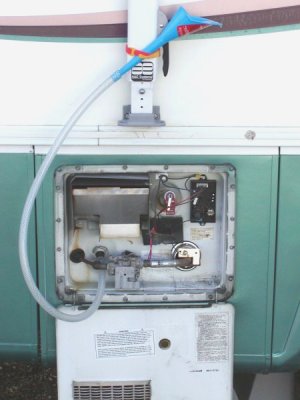
Next, insert the funnel into the other end of the hose and fasten it in some way to hold it above the top of the water heater. With the relief valve in the open position you can now pour the white vinegar into the funnel and thus into the water heater. Use three gallons of vinegar for a six gallon heater and four gallons for an 8 gallon heater. Once all vinegar is in the water heater, pour another gallon of plain water into the funnel to be sure all vinegar is in the heater. If you covered the burner area, remove the plastic from it next. Now, with help from an assistant, turn the water supply back on until the water just begins to come out of the relief valve. Turn off the water and close the relief valve. Now it is time to turn the water heater back on and to allow it to reach the operating temperature. The water will run out of the funnel as the water expands, but that is of no concern as there will be no significant pressure on the water heater and none is needed. Once the water heater turns off, allow it to sit and soak for at least an hour before draining.
This is to soak the lime and minerals coating the heat transfer areas of the water heater and to remove any coating. While it is soaking, if you have one of the electric heating elements that install into the drain plug, put it into a pan and cover it in a 50% solution of vinegar and allow it to soak as well. It will then be easy to remove any mineral build-up from the heating element. If your water heater is a Suburban with an anode, check it and replace it if the rod is 50% or more eaten away. When it is time to drain the water from the heater, just remove the funnel and lower the hose to allow the water to drain, placing the hose on something to prevent dirt from entering it. Then lift the relief valve again and the water will quickly drain. Remove the hose and plug and install the flushing device on to a garden hose and use it to wash the interior of the heater and by pointing it downward you can make sure that all solids will be flushed from the heater. It is a good idea to close the relief valve before flushing to insure that excess water does not overflow from it. Cover the burner area again before you begin the flushing process as water in it will make it fail to light. Continue to use the flushing tool until no more particles of mineral deposits come out. Once the water comes out clean, allow the water to drain, reinstall the drain plug or heating element, and refill the water heater. It will fill faster if you have the relief valve open, but close it before the water reaches the valve level to establish an air bubble in the top of the heater to allow for water expansion. Once the heater is filled, run water through a hot water faucet to be sure the air is all out, then turn the heater back on and you are finished, except for the clean-up. Store the tools in a plastic bag to keep them clean until time to do this job again next year. The final step is to sit back and congratulate yourself on what a skilled RV maintenance tech you are! While doing this a proper dose of your favorite libation is required.